Discord
Verified against the Discord Developer Portal, August 2026.
- How to create a Discord bot in the current Developer Portal and invite it to your server
- Which permissions and intents AutoTalk actually needs
- What the AutoTalk setup flow looks like, including the billing acknowledgement
- What message types, options, and moderation actions are supported
- How to fix the errors people actually hit during setup
The Discord channel connects a Discord bot to one of your Discord servers. AutoTalk hosts the connection: messages from your server's text channels arrive in your Inbox, and replies are posted back by the bot.
When to use this channel
- Your community lives on a Discord server
- You want employees or AI agents to answer or moderate Discord chat from AutoTalk
- You want Discord conversations alongside your other messaging channels
Before you start
You need a Discord account and a server where you have the Manage Server permission — Discord only lets a server member with that permission authorize a bot.
Step 1: Create the application
- Open discord.com/developers/applications and sign in.
- Click New Application (top right).
- Enter a name, tick the Developer Terms of Service / Developer Policy checkbox, and click Create.
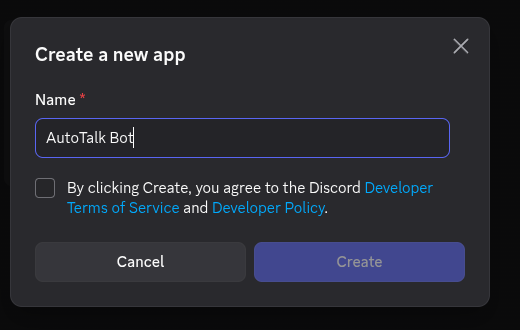
Discord may show a "Wait! Are you human?" captcha at this point — complete it and the app is created.
The app is created with a bot user already attached. There is no separate "add a bot" step.
Step 2: Mint the bot token
- In the left sidebar, open Bot.
- Under Token, click Reset Token.
- Confirm in the "Reset Bot's Token?" dialog by clicking Yes, do it!.
- If your Discord account has 2FA, a separate Multi-Factor Authentication prompt follows — enter your code and Submit. This is a second gate, not part of the previous dialog.
- Copy the token immediately and keep it somewhere safe.

Discord never shows an existing token — that's why there's no Copy button. If you navigate away without copying it, you have to reset again.
Resetting also invalidates the previous token immediately. If a Discord channel is already running on that bot, it stops receiving messages until you paste the new token into the channel; it then reconnects by itself. AutoTalk records the failure on the channel and alerts its operators, but the app doesn't show a notice, so if messages stop, check the bot in the Discord developer portal. Uptime stops being billed once Discord rejects the token or the intents, and resumes when the bot reconnects.
Step 3: Turn on the Message Content Intent
- Still on the Bot page, scroll to Privileged Gateway Intents.
- Turn on Message Content Intent.
- A "Careful — you have unsaved changes!" bar appears at the bottom — click Save Changes. The intent is not applied until you do.
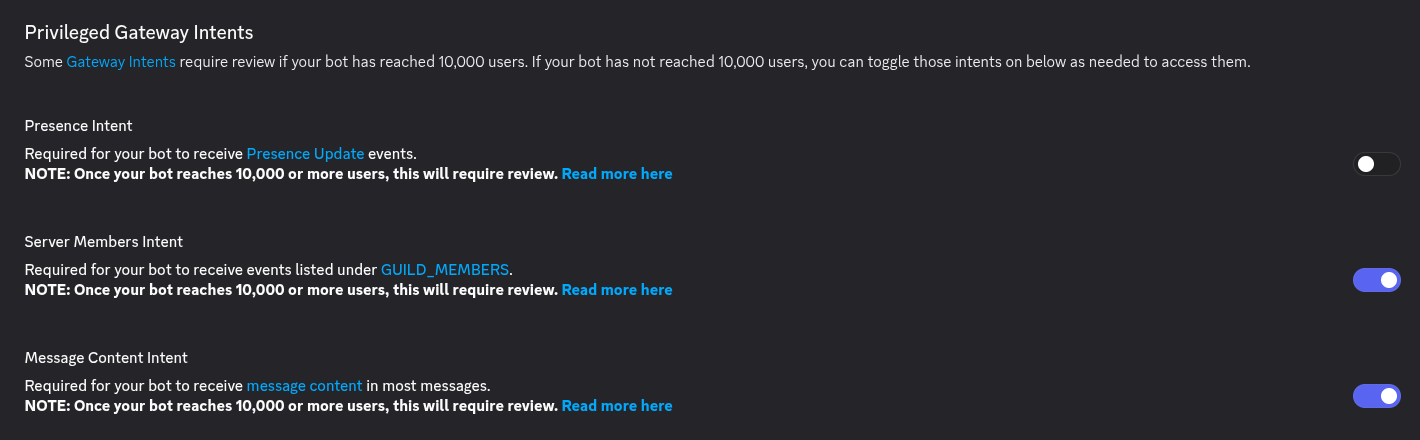
AutoTalk only needs Message Content Intent. Presence Intent and Server Members Intent can stay off.
Without this intent Discord refuses the bot's connection, so the channel never connects and nothing arrives.
Discord only requires a review for privileged intents once your bot reaches 10,000 users. Below that, flipping the toggle is enough.
Step 4: Invite the bot to your server
4a. Check the installation contexts
Open Installation in the left sidebar. Under Installation Contexts, make sure Guild Install is ticked, and untick User Install — AutoTalk doesn't use it, and leaving it on adds an extra prompt in step 4c.

4b. Add the bot scope — this is the step everyone misses
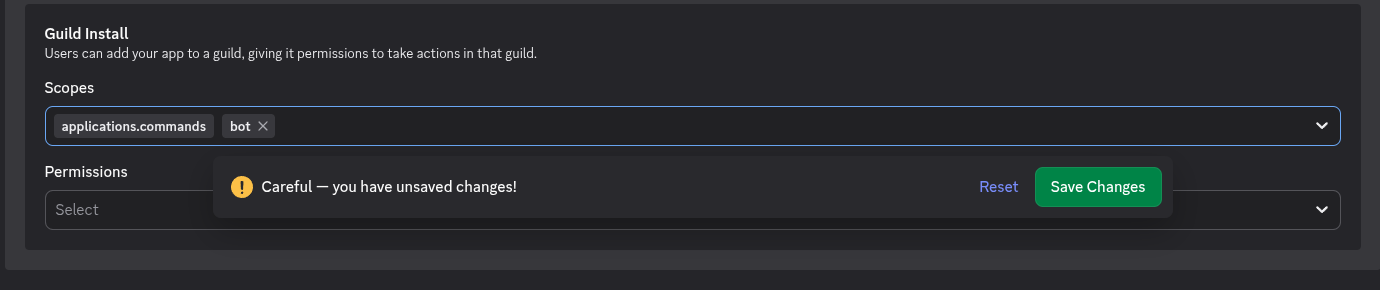
Scroll to Default Install Settings → Guild Install. A newly created app only requests applications.commands:

applications.commands grants slash-command access — it does not put a bot user in your server. Click the Scopes box and add bot:

Adding bot reveals a Permissions picker. Select the permissions your channel needs (see the table below), then click Save Changes.
4c. Open the install link
Under Install Link, keep Discord Provided Link selected and copy the URL next to it.

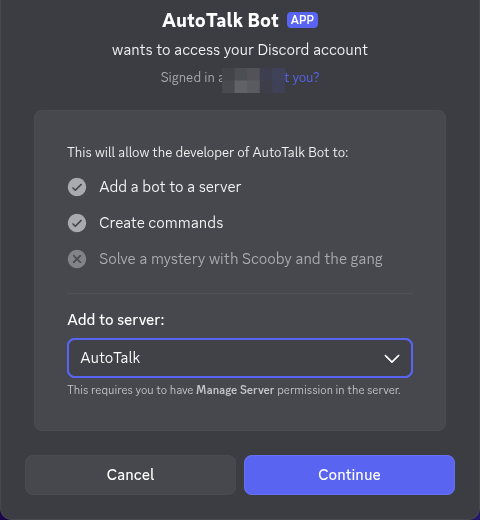
Open that URL in a browser where you're signed in to Discord. The invite takes two screens.
First, a consent screen listing what the app may do. Pick your server under Add to server: and click Continue:
Then a second screen asks you to confirm the permissions the bot will get on that server. Review them and click Authorize:
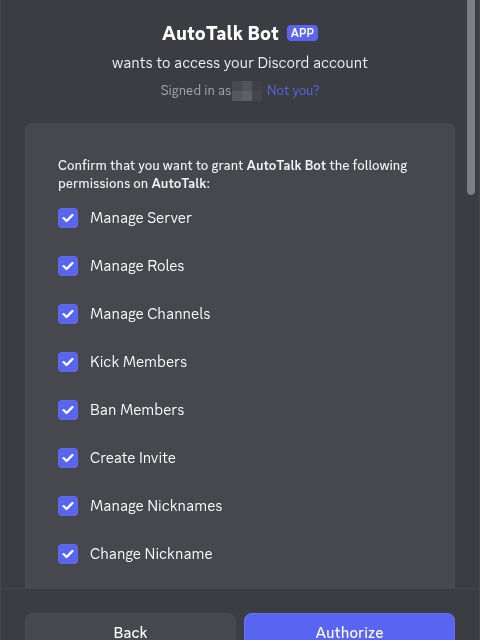
You should land on "<your app> has been authorized and added to <your server>".
You'll get an extra prompt before the consent screen, offering Add to My Apps or Add to Server. Choose Add to Server — "Add to My Apps" installs the app to your own account without putting a bot in the server, and the channel then fails to enable with "Bot is not a member of guild …".
If you prefer the old flow: OAuth2 → URL Generator, tick the bot scope, tick the permissions, then copy the generated URL at the bottom of the page. It produces the same invite.
Which permissions to grant
Grant only what you plan to use. Missing permissions don't break the connection — the individual action just fails at runtime.
These are the names used by the portal's permission picker. Discord's authorization screen renames one of them: Create Instant Invite appears there as Create Invite.
Baseline — needed for the channel to work at all:
| Permission | Why AutoTalk needs it |
|---|---|
| View Channels | See the text channels the bot should listen on |
| Send Messages | Post replies from employees and agents |
| Read Message History | Read replies, reaction targets, and fetch history |
| Embed Links | Send link previews |
| Attach Files | Send images, audio, video, and documents |
| Add Reactions | React to messages |
| Send Messages in Threads | Reply inside threads |
Message operations:
| Permission | Enables |
|---|---|
| Manage Messages | Delete, purge, crosspost, and clear other users' reactions |
| Pin Messages | Pin and unpin messages (a separate permission from Manage Messages) |
| Create Public Threads | Start a thread from a message |
Moderation:
| Permission | Enables |
|---|---|
| Kick Members | Kick a user |
| Ban Members | Ban, unban, list bans, check ban status |
| Manage Server | Bulk ban (Discord requires Ban Members + Manage Server together) |
| Moderate Members | Timeout a user |
| Manage Roles | Add/remove member roles, lock a channel |
| Manage Nicknames | Change another member's nickname |
| Change Nickname | Change the bot's own nickname |
| Manage Channels | Set slowmode |
| View Audit Log | Read the server audit log |
| Create Instant Invite | Create an invite link |
| Mute Members | Voice-mute a member |
| Move Members | Disconnect a member from voice |
A bot can never moderate a member whose highest role sits above the bot's own role, no matter which permissions you granted. If bans or timeouts fail on moderators only, move the bot's role up in Server Settings → Roles.
Step 5: Find your Server ID
-
In the Discord app, click the gear icon (User Settings) → Developer (near the bottom, under Other) → turn on Developer Mode.
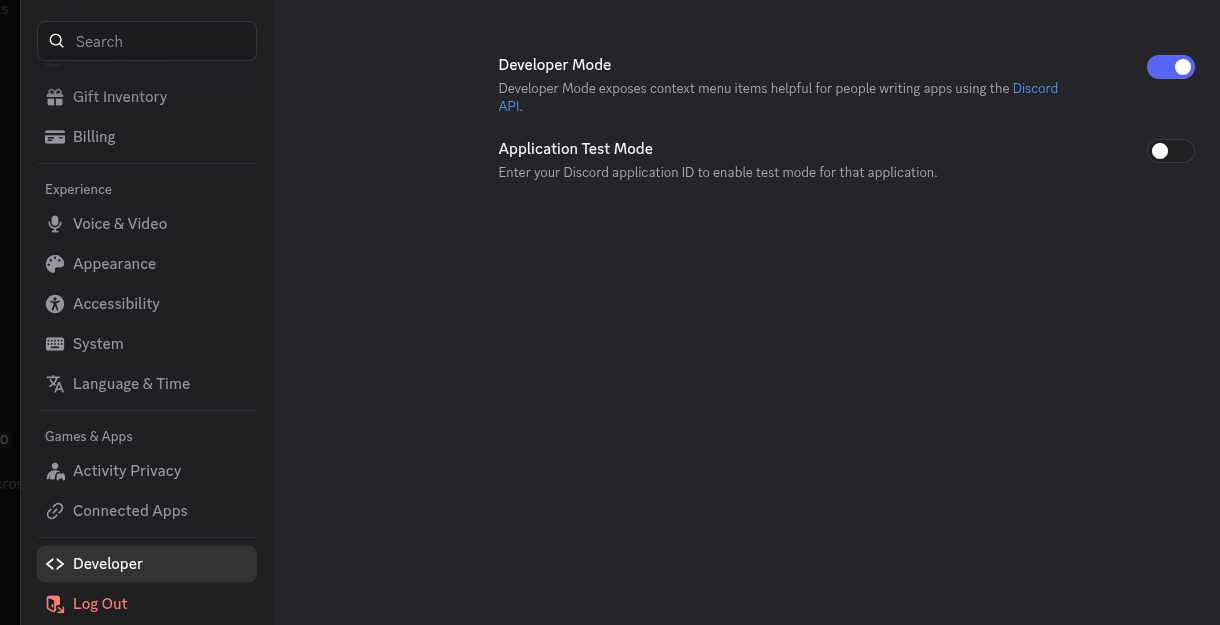 It used to be called "Advanced"
Guides that tell you to look under Advanced are describing the old settings layout.
-
Right-click the server icon in the left rail and choose Copy Server ID (the last item in the menu).
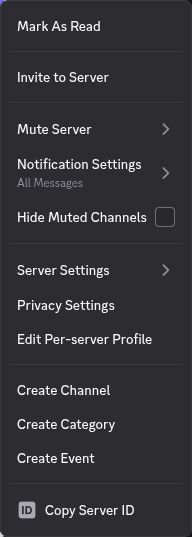
The Server ID (also called the Guild ID) is a 17–20 digit number, e.g. 123456789012345678. If what you copied contains letters or dashes, you copied a channel link or an invite code instead.
Step 6: Connect the bot to AutoTalk
- In the sidebar, go to Integrations > Channels and click the + button (tooltip "Add channel") to open the New channel page.
- In the channel picker, select the Discord tile (in the Bots & communities group).
- Store the bot token. Bot token is not a text box — it's a picker that reads "Select a secret variable…". Click Add item beside it, give the variable a name (e.g.
Discord bot token), leave Secret switched on, paste the token into the value box, and click Save. The picker then shows the variable with its value masked as••••••. Tokens are stored encrypted in your company variables, never in the channel itself. - Enter the Server ID (Guild ID).
- Review the Connection cost panel and tick the acknowledgement under Acknowledgements confirming the hosted-connection cost.
- Click Create & enable channel.
The channel is created and enabled in one step — metering starts right after. During enablement AutoTalk verifies the token and checks that the bot is a member of your server; if it isn't, enabling fails with a message asking you to invite the bot first.
Troubleshooting
| Symptom | Cause | Fix |
|---|---|---|
| Enable fails: "Bot is not a member of guild … Make sure to invite the bot to your server first" | The install link didn't add a bot (missing bot scope), you picked Add to My Apps, or the Server ID belongs to a different server | Redo Step 4b, re-open the install link, choose Add to Server, and re-check the Server ID |
| Enable fails with a token/authorization error | The token was reset again after you pasted it, or only part of it was copied | Mint a fresh token (Step 2) and update the channel's bot token |
| Channel never connects and nothing arrives | Message Content Intent is off (or the change wasn't saved) | Turn it on (Step 3); the channel reconnects by itself within a few minutes |
| Bot shows online in Discord but nothing reaches the Inbox | Channel Filter lists channels the bot can't see, the bot lacks View Channels on that category, or Respond only to mentions is on | Clear the filter, check channel-level permission overwrites, and review the channel's options |
| Direct messages to the bot never arrive | A non-empty Channel Filter also drops DMs — a DM's channel ID is never in the list | Leave Channel Filter empty on channels that should receive DMs |
| Replying to the bot's message gets ignored | With Respond only to mentions on, Discord requires an explicit @mention — a reply alone doesn't count | Mention the bot, or turn the option off |
| The bot can post text but not files or embeds | Missing Attach Files / Embed Links | Re-invite with the permission ticked, or grant the bot's role that permission in Server Settings → Roles |
| A moderation action fails on some users only | Discord's role hierarchy — the target outranks the bot | Move the bot's role above the roles it must moderate |
Billing
Discord is a hosted connection: it is billed per minute while the channel is online, 24/7 (the channel_minutes_discord meter). A disabled channel costs nothing — use Disable on the channel's edit page to stop the charge. See Usage Rates for details.
Supported message types
Incoming from your server:
- Text messages and attachments (images, audio, video, documents)
- Message edits and deletions, reflected in the conversation
- Emoji reactions
- Button clicks on option messages
- Direct messages sent to the bot, as a per-user conversation
Outgoing from AutoTalk:
- Text messages — long messages are split automatically
- Media files (images, audio, video, documents)
- Interactive options, rendered as Discord buttons (larger lists fall back to a numbered text list)
- Edits and deletions of messages sent by your team or agents
Channel options
On the channel's edit page you can adjust:
- Channel Filter — listen only on specific text channel IDs. An empty filter receives every text channel of the server and every direct message to the bot. A non-empty filter receives only the listed server text channels and no direct messages, even if a DM channel ID is listed. Threads and forum posts have their own channel IDs, so listing a parent channel does not include them.
- Use shared conversation — on by default: each Discord text channel appears as a single conversation, like a group chat. Turn it off to give each user their own conversation.
- Respond only to mentions — only respond when the bot is explicitly mentioned in chat. On Discord, replying to one of the bot's messages does not count as a mention.
Use Channel Filter to keep the bot scoped to a support or moderation channel instead of your whole server.
Moderation actions
Discord channels expose a broad set of moderation and channel actions that can be run from the channel page or called from workflows and agents. Get Discord Member, Ban User, Kick User, Timeout User, and Delete Message are just a few examples — the full set is much larger and is not limited to these. Grouped by area, Discord channels support:
- Member management — ban, kick, timeout, unban, roles, nicknames, member search, and voice mute/disconnect
- Message operations — delete, pin, react, start thread, crosspost, and purge messages
- Channel controls — audit log, bans list, bulk-ban, invites, slowmode, lock, and list pins
The complete list appears in the action picker when you build a workflow or agent. See the Discord Spam Moderator example for a complete moderation agent built on them.
Important considerations
- Metering starts as soon as the channel is created — disable it when you don't need it.
- The bot must stay in your server and the Message Content Intent must remain enabled.
- If the bot is removed from the server, messages stop until you invite it again (Step 4). The channel is still billed in the meantime, so disable it if you won't re-invite the bot soon.
- If the token is reset or revoked, or the Message Content Intent is turned off, Discord rejects the connection. Paste a new token (or turn the intent back on) and the channel reconnects by itself; for the intent, within about five minutes. AutoTalk records the failure on the channel and alerts its operators, but the app doesn't show a notice, so if messages stop, check the bot in the Discord developer portal. Uptime stops being billed once Discord rejects the token or the intents, and resumes when the bot reconnects.
- One channel connects one server. To connect a second server, create another Discord channel.
- While a channel is enabled, its Server ID can't be changed, and its bot token can only be replaced by a new token of the same bot (rotation). To switch bots or servers, disable the channel, change it, and enable it again.
Sharing one bot between channels
One bot can serve several AutoTalk channels only if they would never receive the same events:
- On the same server, the channels' Channel Filters must not overlap. An empty filter overlaps everything.
- Across different servers, at most one of the channels may have an empty filter (it receives the bot's direct messages), and filtered channels on different servers can't list the same ID.
Otherwise, enabling is refused with a message that this bot is already active — and so is changing an enabled channel's Channel Filter into one that overlaps. Set non-overlapping filters, use a different bot, or disable the other channel. That channel may belong to another account; if you can't find it, contact support.
Next steps
- Inbox & Messaging — Manage incoming Discord conversations
- AI Agents — Automate Discord replies with an agent
- IRC — Connect IRC networks or Twitch chat